


How to Choose the Best Temperature and Humidity Meter for Your Grow Tent
Introduction
If you've ever walked into your grow tent and wondered why your plants look stressed, the answer often hides in two invisible factors: temperature and humidity. A reliable temperature and humidity meter—also called a thermo-hygrometer—is your window into your growing environment's health.
As indoor cultivators ourselves since 2018, we've tested dozens of monitoring devices across multiple grow cycles. The difference between a thriving garden and a struggling one frequently comes down to environmental awareness. In fact, research from Wageningen University (2024) confirms that maintaining optimal temperature and humidity ranges can improve plant yields by 15-30%.
This guide covers everything you need to know about selecting, placing, and using a temperature and humidity meter in your indoor garden. Whether you're a first-time grower or a seasoned cultivator upgrading your setup, you'll find actionable advice backed by real-world experience and current 2026 industry standards.
What Is a Temperature and Humidity Meter and Why Does It Matter?
A temperature and humidity meter is an electronic device that measures ambient air temperature (in Fahrenheit or Celsius) and relative humidity (RH percentage) simultaneously. These two metrics directly influence every aspect of plant growth—from nutrient uptake to disease resistance.
Understanding Relative Humidity in Growing Environments
Relative humidity (RH) represents the percentage of water vapor in the air compared to the maximum amount the air can hold at that temperature. Here's why this matters for growers:
- High humidity (above 70% RH) creates conditions for mold, mildew, and bud rot
- Low humidity (below 30% RH) causes plant stress, slow growth, and nutrient lockout
- Optimal humidity varies by growth stage, ranging from 65-70% for seedlings to 40-50% during flowering
Plants "breathe" through tiny pores called stomata. When humidity falls outside the ideal range, stomata either close (reducing CO2 intake) or remain too open (causing excessive water loss). Both scenarios stunt growth.
For a detailed breakdown of ideal ranges at each growth stage, check out our Grow Room Temp and Humidity Chart.
The Temperature-Humidity Relationship
Temperature and humidity share an inverse relationship that smart growers must understand. As temperature rises, air holds more moisture, effectively lowering relative humidity. Conversely, cooling air increases RH even without adding moisture.
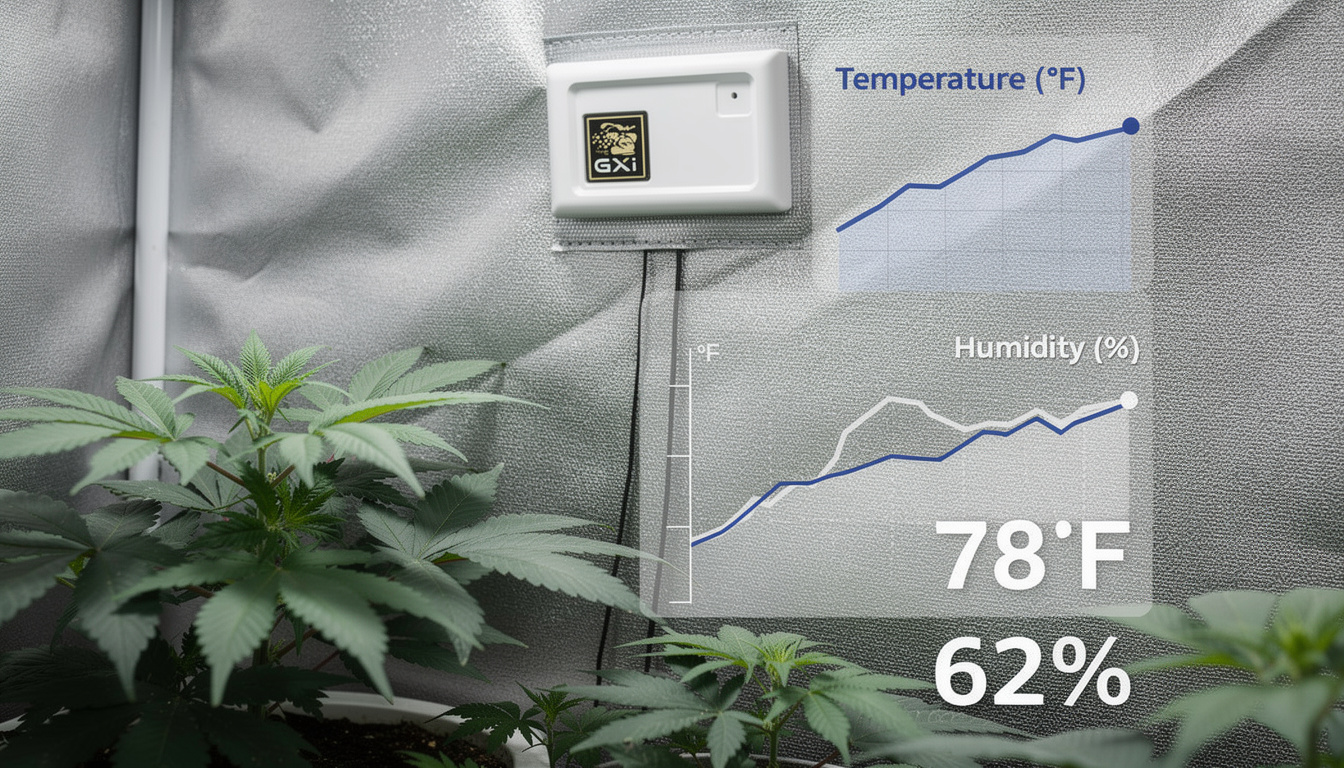
This relationship explains why nighttime humidity spikes cause problems. When your grow lights turn off and temperatures drop 10-15°F, RH can jump 20-30% overnight—creating prime conditions for fungal diseases.

Types of Temperature and Humidity Meters for Indoor Growing
Not all thermo-hygrometers serve growers equally. Understanding the differences helps you choose wisely.
Basic Digital Hygrometers
Entry-level digital meters provide instant readings on an LCD screen. They're affordable ($10-25) and suitable for beginners monitoring a single grow tent.
- Budget-friendly
- Easy to read
- No setup required
Cons:
- No data logging
- Limited accuracy (±3-5% RH)
- Single-point monitoring only
Wireless Sensor Systems
Mid-range wireless systems ($40-100) include remote sensors that transmit data to a base station or smartphone app. These allow monitoring multiple zones simultaneously.
- Monitor from outside the tent
- Track multiple locations
- Basic data logging
- Alert notifications
Cons:
- Requires batteries or charging
- Potential connectivity issues
- More complex setup
Smart Climate Controllers
Advanced monitoring systems ($150-400+) integrate temperature and humidity sensing with automated controls. These devices can trigger fans, humidifiers, or dehumidifiers automatically.
- Automation capabilities
- Precision accuracy (±1-2% RH)
- Comprehensive data logging
- Integration with other smart devices
Cons:
- Higher investment
- Steeper learning curve
- May require additional compatible equipment
When building a complete monitoring setup, consider pairing your meter with quality Grow Tent Accessories like circulation fans and ducting for comprehensive climate control.
How to Use a Temperature and Humidity Meter Effectively
Owning a meter means nothing without proper usage. Follow this step-by-step framework for accurate readings and actionable insights.
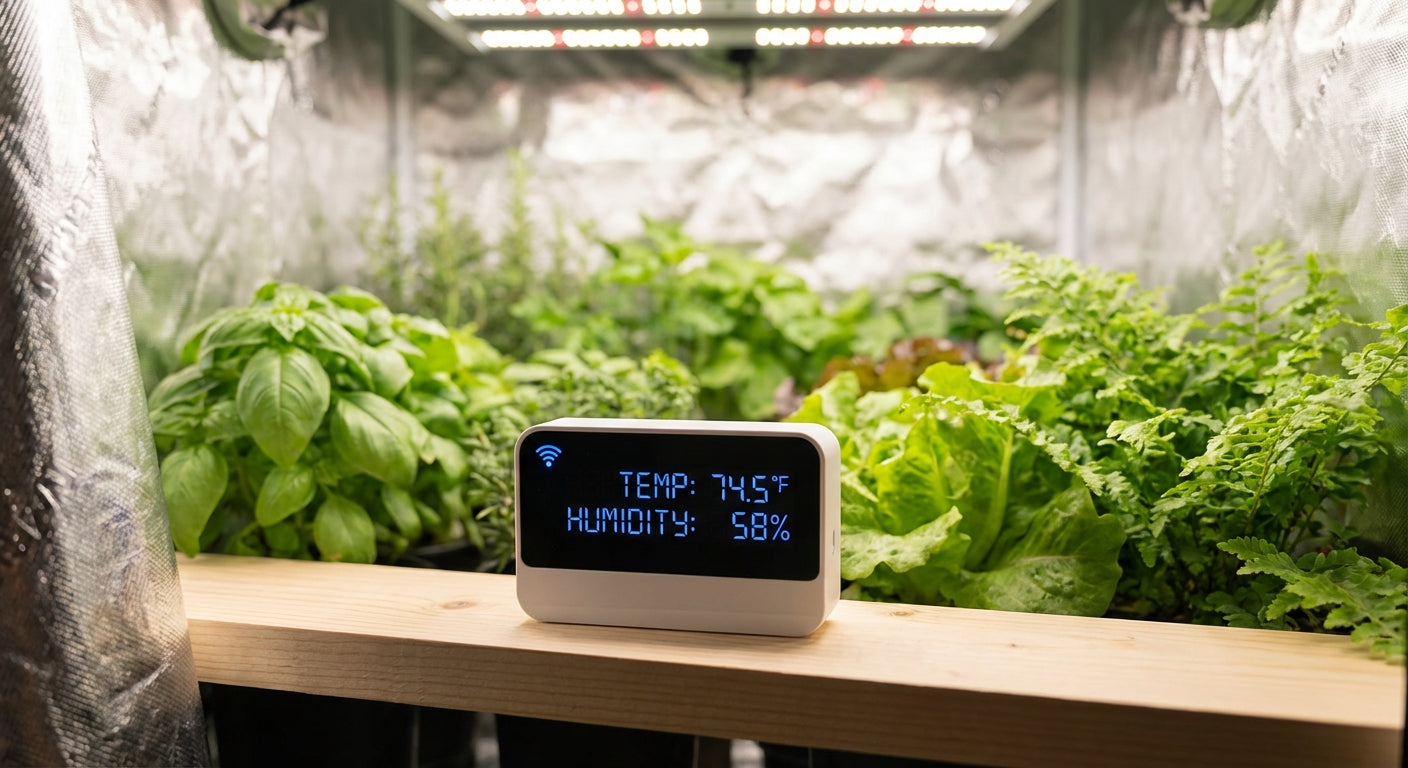
Step 1 — Optimal Sensor Placement
Where you place your temperature and humidity meter dramatically affects reading accuracy. Follow these placement guidelines:
- Position at canopy level — Place sensors at the same height as your plant tops, not on the floor or ceiling
- Avoid direct light — Keep sensors shaded from grow lights to prevent false temperature readings
- Stay away from vents — Position at least 12 inches from intake or exhaust fans
- Use multiple sensors — Large tents benefit from 2-3 sensors in different zones

Step 2 — Calibrating Your Meter
Even quality meters drift over time. Calibrate your temperature and humidity meter every 3-6 months using this salt test method:
- Fill a bottle cap with table salt
- Add enough water to create a wet paste (not floating)
- Place the cap and your meter in a sealed zip-lock bag
- Wait 6-8 hours at stable room temperature
- Your meter should read 75% RH (±3%)
- Adjust or note the offset if readings differ
Step 3 — Interpreting and Acting on Data
Raw numbers mean nothing without context. Use these benchmarks for indoor growing environments:
Seedling/Clone Stage:
- Temperature: 72-78°F (22-26°C)
- Humidity: 65-70% RH
Vegetative Stage:
- Temperature: 70-85°F (21-29°C)
- Humidity: 50-70% RH
Flowering Stage:
- Temperature: 65-80°F (18-26°C)
- Humidity: 40-50% RH
Late Flowering/Harvest:
- Temperature: 65-75°F (18-24°C)
- Humidity: 35-45% RH
Our comprehensive guide on Maintaining Optimal Conditions in Growing Tents provides deeper insights into managing these variables throughout your plant's lifecycle.
Common Temperature and Humidity Problems (And How to Fix Them)
Even experienced growers encounter environmental challenges. Here's how to diagnose and solve the most frequent issues.
High Humidity Solutions
Excess humidity promotes mold, powdery mildew, and bud rot. If your temperature and humidity meter consistently reads above 60% RH during flowering, take immediate action:
- Increase air exchange — Upgrade exhaust fans or increase ventilation speed
- Add a dehumidifier — Size appropriately for your space (calculate pints/day needed)
- Reduce watering frequency — Excess soil moisture evaporates into tent air
- Space plants properly — Crowded canopies trap moisture
For detailed strategies, read our article on How to Reduce Humidity in Grow Tent.
Temperature Fluctuation Fixes
Wild temperature swings stress plants more than consistently imperfect temps. If your meter shows more than 15°F difference between lights-on and lights-off periods:
- Use dimmable or adjustable lighting — LED fixtures run cooler than HPS
- Insulate your growing space — Quality grow tents maintain more stable temperatures
- Add a small heater with thermostat — Prevent overnight temperature crashes
- Improve air circulation — Oscillating fans distribute heat evenly

Vapor Pressure Deficit (VPD) — The Advanced Metric
Experienced growers monitor VPD rather than temperature and humidity separately. VPD measures the "drying power" of air by calculating the difference between actual and saturated moisture levels.
VPD Definition: Vapor Pressure Deficit represents the difference between the amount of moisture currently in the air and how much moisture the air could hold when saturated, measured in kilopascals (kPa).
Optimal VPD ranges:
- Seedlings/Clones: 0.4-0.8 kPa
- Vegetative: 0.8-1.2 kPa
- Flowering: 1.0-1.5 kPa
Many 2026 climate controllers now calculate VPD automatically from temperature and humidity inputs.
Integrating Monitoring with Hydroponic Systems
Temperature and humidity control becomes especially critical in hydroponic setups where environmental factors directly impact nutrient solution performance.
Water temperature in reservoir systems should stay between 65-72°F (18-22°C). Warmer water holds less dissolved oxygen, increasing root disease risk. Meanwhile, ambient humidity affects transpiration rates, which directly influences how quickly plants uptake nutrients.
If you're running a DWC Hydroponic System, monitoring both air and water temperature provides comprehensive environmental awareness. Consider a meter that tracks both metrics for complete control.
Frequently Asked Questions About Temperature and Humidity Meters
Q1: How accurate should a temperature and humidity meter be for growing?
For indoor growing, choose a temperature and humidity meter with ±3% RH accuracy or better. Professional growers often prefer ±1-2% accuracy for precise VPD calculations. Temperature accuracy within ±1°F is standard for quality meters and sufficient for most applications.
Q2: Where is the best place to put a hygrometer in a grow tent?
Place your hygrometer at plant canopy level, approximately 12-18 inches from any light source, and away from intake or exhaust fans. This position provides the most accurate reading of what your plants actually experience. Using multiple meters at different heights reveals potential hot spots or humidity pockets.
Q3: How often should I check my grow tent temperature and humidity?
Check readings at least twice daily—once during lights-on and once during lights-off periods. This reveals the full range your plants experience. Better yet, use a meter with min/max memory or data logging to capture values continuously without manual checking.
Q4: Can I use a regular household thermometer for my grow tent?
While basic household thermometers measure temperature, they typically lack humidity sensing capabilities essential for plant health. Dedicated thermo-hygrometers designed for growing environments provide both metrics with appropriate accuracy and often include features like min/max memory specifically useful for cultivation.
Q5: What humidity level causes mold in a grow tent?
Mold risk increases significantly when relative humidity exceeds 60% during flowering stage, especially when combined with poor air circulation and temperatures below 70°F. Keeping humidity at 40-50% RH during flowering with adequate airflow virtually eliminates mold and bud rot risk.
Q6: Do I need a temperature and humidity meter with WiFi?
WiFi-connected meters offer convenience for remote monitoring and historical data analysis but aren't essential for successful growing. If you frequently leave your grow space unattended or manage multiple tents, WiFi connectivity provides valuable peace of mind through smartphone alerts when conditions drift outside safe ranges.
Q7: How do I know if my temperature and humidity meter is accurate?
Perform a salt calibration test every 3-6 months. Place your meter in a sealed container with a saturated salt solution for 6-8 hours. An accurate meter should read 75% RH (±3%). You can also compare readings against a second meter as a quick accuracy check.
Conclusion: Take Control of Your Growing Environment Today
Mastering your grow tent climate starts with reliable monitoring. Here are the key takeaways from this guide:
- A quality temperature and humidity meter is essential—not optional—for consistent indoor growing success
- Proper placement matters as much as meter quality; always position sensors at canopy level away from lights and vents
- Different growth stages require different conditions, ranging from 65-70% RH for seedlings to 40-50% RH during flowering
- Regular calibration ensures your readings remain accurate over time
- Consider VPD monitoring as your skills advance for professional-level environmental control
Don't let invisible environmental problems sabotage your grow. Whether you're troubleshooting existing issues or setting up a new space, accurate monitoring forms the foundation of successful cultivation.
Ready to Optimize Your Growing Environment?
Shop Gorilla Grow Tent Accessories →
Pair your new temperature and humidity meter with professional-grade ventilation, circulation fans, and climate control equipment. Gorilla Grow Tent accessories are built to the same uncompromising standards as our industry-leading tents—because your plants deserve the best environment possible.