


How Far Should Your Grow Lights Be From Plants? The Complete 2026 Distance Guide
Getting grow light distance right is one of the most critical—yet commonly misunderstood—factors in indoor gardening success. Position your lights too close, and you risk light burn, bleaching, and stunted growth. Hang them too far away, and your plants stretch weakly toward the light, producing disappointing yields.
After testing dozens of lighting setups and consulting with cultivation experts throughout 2025-2026, we've compiled the definitive guide to grow light placement. Whether you're growing vegetables, herbs, or flowering plants, this guide gives you the exact measurements you need.
Here's what you'll learn: specific distance recommendations by light type, a comprehensive height chart for every growth stage, signs your lights are positioned incorrectly, and step-by-step instructions for dialing in the perfect placement. Our recommendations are based on PAR (Photosynthetically Active Radiation) measurements, manufacturer specifications, and real-world growing experience from thousands of indoor gardeners.
Let's eliminate the guesswork and help your plants thrive.
Understanding Grow Light Distance Basics
Before diving into specific measurements, you need to understand why distance matters so much. The relationship between light intensity and plant health follows the inverse square law: when you double the distance, light intensity drops to one-quarter.
What Is PAR and Why Does It Matter?
PAR stands for Photosynthetically Active Radiation. It measures the light wavelengths (400-700 nanometers) that plants actually use for photosynthesis. PAR is measured in PPFD (Photosynthetic Photon Flux Density), expressed as μmol/m²/s.
Optimal PPFD ranges by growth stage:
- Seedling: 100-300 μmol/m²/s (16-18 hours)
- Vegetative: 400-600 μmol/m²/s (18 hours)
- Flowering: 600-900 μmol/m²/s (12 hours)
- Late Bloom: 700-1,000+ μmol/m²/s (12 hours)
Understanding these numbers helps you position lights correctly. A quality LED grow light typically outputs 800-1,200 PPFD at 12 inches—far too intense for seedlings but perfect for flowering plants.
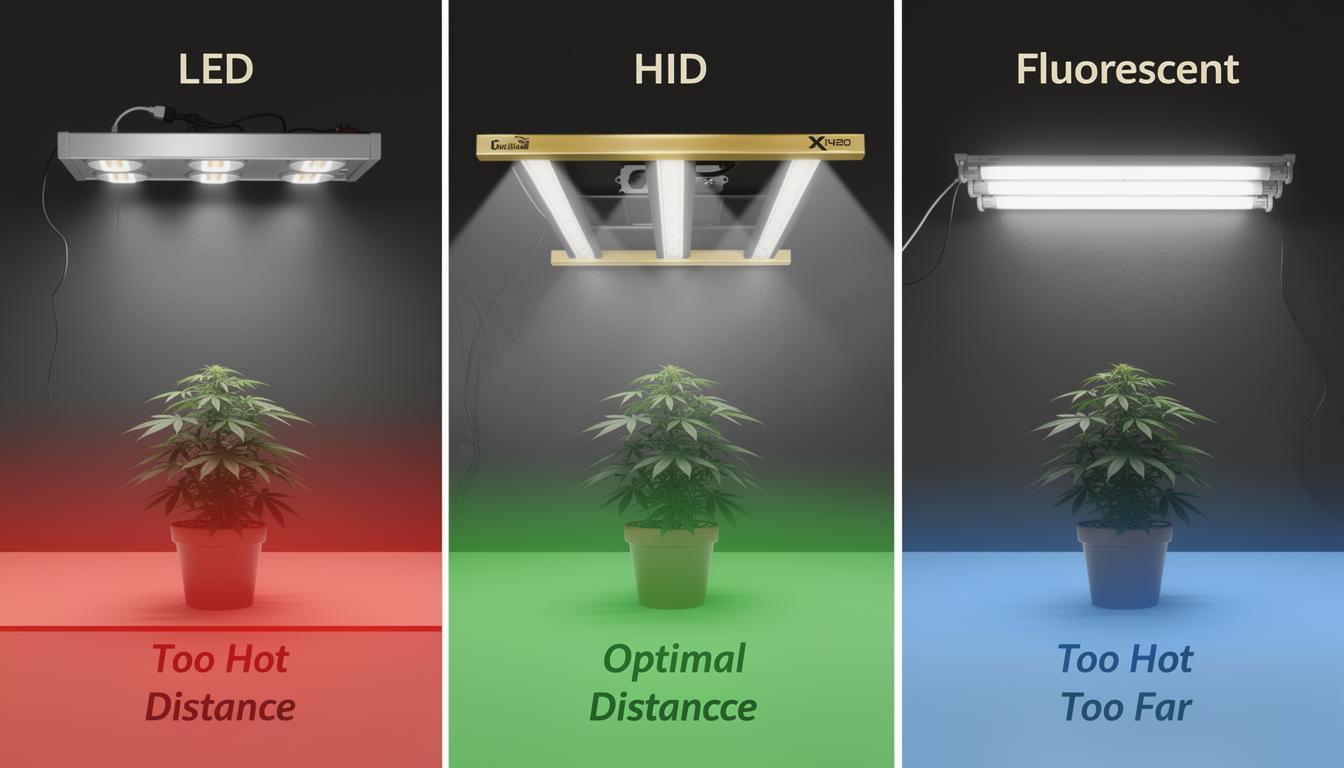
Light Type Dramatically Affects Distance
Different grow light technologies produce varying heat levels and light intensities. This directly impacts how close you can safely position them.
LED grow lights run coolest and most efficiently. Modern LEDs like the Efficient and Powerful LED Grow Lights GXi can be positioned 12-24 inches from plant canopies without heat stress. Their focused spectrum delivery means more usable light reaches your plants.
HID lights (HPS/MH) generate significant heat. They typically require 18-36 inches of clearance. Many growers have shifted away from HIDs due to energy costs and heat management challenges.
Fluorescent lights (T5/CFL) produce minimal heat but lower intensity. They can sit 6-12 inches from plants, making them ideal for seedlings and clones.

Complete Grow Light Distance Chart by Growth Stage
Your plants' light needs change dramatically as they develop. What's perfect for a flowering plant will devastate a seedling. Use this comprehensive chart as your starting point, then adjust based on your specific setup.
Seedling Stage Distance (Weeks 1-3)
Seedlings are incredibly fragile. Their undeveloped leaves cannot process intense light.
Recommended LED distance: 24-36 inches
Recommended PPFD: 100-300 μmol/m²/s
Light schedule: 16-18 hours on
During this stage, watch for stretching (light too far) or leaf curling (light too close). Healthy seedlings develop short, sturdy stems with vibrant green leaves.
For detailed guidance on this critical phase, check out our complete guide on How Far Should LED Grow Lights Be From Plants which covers seedling-specific techniques in depth.
Vegetative Stage Distance (Weeks 3-8)
Plants in vegetative growth can handle—and benefit from—more intense light. This is when rapid leaf and stem development occurs.
Recommended LED distance: 18-24 inches
Recommended PPFD: 400-600 μmol/m²/s
Light schedule: 18 hours on
Lower your lights gradually—no more than 2 inches every few days. Sudden changes stress plants. Monitor new growth for signs of light stress.
Flowering Stage Distance (Weeks 8+)
Flowering plants demand the most light. Proper intensity during this stage directly impacts yield quality and density.
Recommended LED distance: 12-18 inches
Recommended PPFD: 600-900 μmol/m²/s
Light schedule: 12 hours on
Our LED Grow Light Distance Chart: Optimal Height for Each Growth Stage provides a printable reference you can hang in your grow space for quick adjustments.

Signs Your Grow Light Distance Is Wrong
Even with perfect initial placement, you need to monitor plants daily. They'll tell you exactly what they need—if you know what to look for.
Light Burn and Light Stress Symptoms
When lights are too close, plants exhibit specific warning signs:
- Bleached or white leaf tips – Most common symptom; appears on leaves closest to light
- Yellow or brown spots – Tissue damage from excessive light intensity
- Upward curling leaves – Plants attempting to reduce light exposure
- Slow or stunted growth – Energy diverted to stress response
Light burn differs from nutrient burn. Light damage appears on upper leaves first and produces a bleached, whitish appearance. Nutrient issues typically show on lower leaves with brown, crispy edges.
Insufficient Light Symptoms
Lights positioned too far cause different problems:
- Stretching or "leggy" growth – Long, weak stems reaching for light
- Pale green or yellow leaves – Insufficient light for chlorophyll production
- Slow growth rates – Not enough energy for robust development
- Small or airy flowers – Inadequate light during bloom phase
According to a 2025 study published in Frontiers in Plant Science, plants receiving less than 200 PPFD during flowering produced 40% lower yields compared to those receiving optimal 600+ PPFD levels.
The Hand Test Method
Here's a simple test anyone can perform: Place the back of your hand at canopy level for 30 seconds. If it feels uncomfortably warm, your lights are too close. This method works especially well with HID lighting.
For LEDs, the heat test is less reliable since they run cool. Instead, invest in a PAR meter ($100-300) or use a smartphone lux meter app as a rough guide. Multiply lux readings by 0.015 to estimate PPFD for full-spectrum white LEDs.

How to Adjust Grow Light Height Step-by-Step
Step 1: Start High and Work Down
Begin with your lights at the maximum recommended distance for your plant's growth stage. It's easier to recover from insufficient light than from light burn. Allow 3-5 days for plants to acclimate before making changes.
Step 2: Lower Gradually
Drop your lights by 1-2 inches every 2-3 days. Monitor closely for stress signs after each adjustment. Document changes in a grow journal—this data becomes invaluable for future grows.
Step 3: Use Dimmable Features
Modern LED systems like the GXi LED Grow Lights include dimming controls. Start at 50-75% intensity for seedlings. Increase power as plants mature rather than constantly adjusting height.
Step 4: Account for Grow Tent Size
Your tent dimensions affect light distribution. In a 4x4 tent, hanging lights too low creates hotspots in the center and dark edges. For tent-specific recommendations, our Best Grow Light for 4x4 Tent: Complete 2025 Buyer's Guide covers optimal positioning for maximum coverage.
Frequently Asked Questions
Q: How far should LED grow lights be from seedlings?
A: LED grow lights should be positioned 24-36 inches from seedlings. Young plants cannot process intense light and will experience stress, bleaching, or stunted growth if lights are too close. Start high and lower gradually as plants develop their first true leaves.
Q: What happens if grow lights are too close to plants?
A: When grow lights are positioned too close, plants experience light burn characterized by bleached white or yellow leaf tips, brown spots, curling leaves, and slowed growth. Severe cases cause permanent tissue damage. Always monitor upper leaves for early warning signs.
Q: How do I know if my plants need more light?
A: Plants needing more light display stretching (tall, weak stems), pale or yellowing leaves, slow growth, and small or loose flowers. If your plants are reaching upward or leaning toward the light source, they're signaling insufficient light intensity.
Q: Should I adjust grow light height during flowering?
A: Yes, flowering plants benefit from closer light positioning. Lower your LED grow lights to 12-18 inches during flowering to provide 600-900 PPFD. This increased intensity supports dense flower development and maximizes yields. Monitor for bleaching as you lower lights.
Q: How often should I check grow light distance?
A: Check grow light distance daily during rapid growth phases. Plants can grow 1-2 inches per day during vegetative growth, quickly closing the gap to your lights. Weekly adjustments are typically needed. Use adjustable rope hangers for easy modifications.
Q: Do different plants need different light distances?
A: Yes, light requirements vary by plant species. Leafy greens like lettuce thrive at lower intensities (200-400 PPFD) with lights at 18-24 inches. Fruiting plants like tomatoes and peppers need higher intensities (400-600 PPFD) with closer positioning. Always research your specific crop.
Q: Can I use a light meter instead of measuring distance?
A: Absolutely—using a PAR meter is more accurate than measuring distance alone. Different lights have varying intensities at the same height. Target specific PPFD ranges for each growth stage: 100-300 for seedlings, 400-600 for vegetative, and 600-900 for flowering.
Conclusion: Getting Your Grow Light Distance Right
Proper grow light positioning transforms indoor growing results. Remember these key takeaways:
- Start high, adjust low – Begin at maximum recommended distance and lower gradually over days, not hours
- Growth stage matters – Seedlings need 24-36 inches; vegetative plants need 18-24 inches; flowering plants need 12-18 inches
- Watch your plants – They communicate through leaf color, texture, and growth patterns
- Invest in measurement – A PAR meter removes guesswork and prevents costly mistakes
- Use dimmable LEDs – Adjusting intensity offers more flexibility than height changes alone
The difference between average and exceptional yields often comes down to lighting mastery. Take time to dial in your setup properly.
🌱 Ready to Upgrade Your Lighting Setup?
Stop guessing and start growing with confidence. The GXi LED Grow Lights feature built-in dimming, optimal spectrum technology, and the efficiency today's growers demand.
🔥 Shop Now and get your grow room dialed in before your next planting cycle!
Questions about grow light placement? Drop a comment below or contact our expert support team.