


How to Fix Nutrient Burn in Plants: A Step-by-Step Guide
What Is Nutrient Burn?
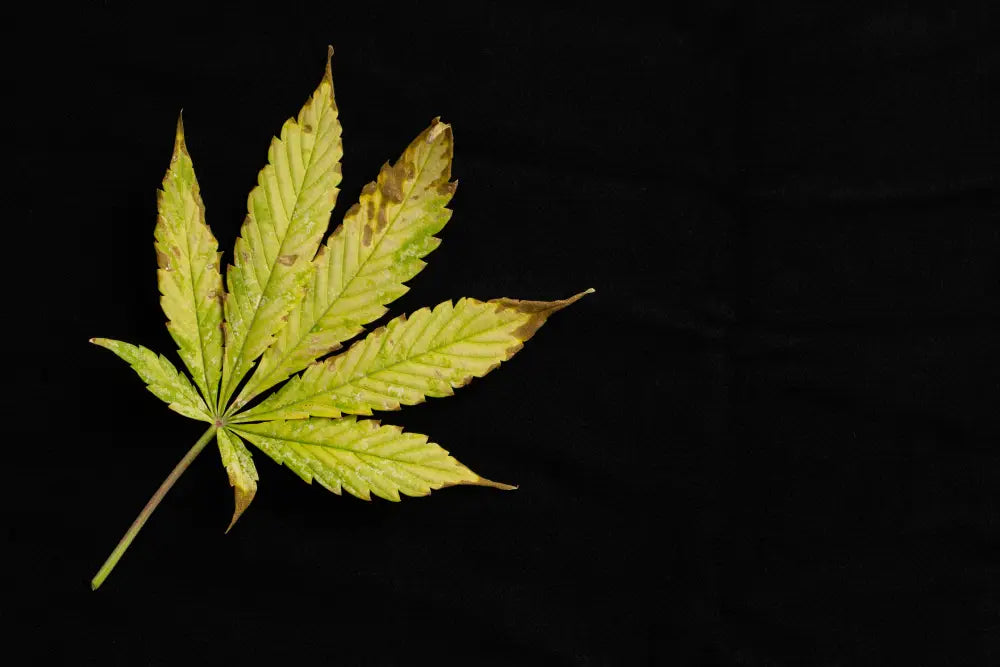
Nutrient burn occurs when plants receive too many nutrients, especially nitrogen, causing the tips of the leaves to turn yellow or brown and eventually dry out. This is a common issue in both soil-based and hydroponic gardening, often resulting from over-fertilizing. While nutrient burn can be damaging to plant health and growth, it can be corrected with proper care and attention. In this guide, we’ll explain how to identify and fix nutrient burn to restore your plants to health.
1. Signs of Nutrient Burn
Before addressing nutrient burn, it’s important to recognize the signs. Here’s what to look for:
- Burnt Leaf Tips: The most obvious sign of nutrient burn is yellowing or browning at the tips of the leaves. This typically starts at the edges and moves inward.
- Dark Green Leaves: Excess nitrogen can cause the leaves to turn a dark green color before the burn appears.
- Curling Leaves: Leaves affected by nutrient burn may curl downwards or become brittle and dry.
- Slow Growth: Plants suffering from nutrient burn may also show stunted growth as they struggle to process the excess nutrients.
2. Causes of Nutrient Burn
Nutrient burn is primarily caused by over-fertilizing, but other factors can contribute to the problem:
- Over-Fertilizing: Adding too much fertilizer or using a nutrient solution that is too strong can overwhelm the plant’s root system.
- Improper pH Levels: If the pH of the soil or nutrient solution is out of balance, it can prevent plants from absorbing nutrients properly, leading to nutrient burn.
- Watering Issues: Over-watering or under-watering can also affect how well plants absorb nutrients, potentially leading to a nutrient overload.
3. How to Fix Nutrient Burn
If your plants are suffering from nutrient burn, the good news is that it can be fixed. Follow these steps to remedy the problem and prevent further damage:
Step 1: Flush the Soil or Growing Medium
The first step in fixing nutrient burn is to flush the soil or growing medium to remove excess nutrients. This helps to reset the nutrient levels and gives the plant a fresh start.
- For Soil: Use clean, pH-balanced water to flush the soil. Water your plants generously, allowing the excess water to drain out of the bottom. This helps to wash away any accumulated salts and nutrients.
- For Hydroponics: In a hydroponic system, drain the nutrient solution and replace it with pH-balanced water. Run the system with just water for a day or two to allow the plants to recover.
Step 2: Adjust Nutrient Levels
Once the soil or growing medium has been flushed, you’ll need to adjust the nutrient levels to prevent further nutrient burn.
- Reduce Fertilizer Strength: Lower the strength of your fertilizer solution by diluting it with water. It’s best to start with a 50% reduction in nutrients and gradually increase the concentration if needed.
- Monitor Nutrient Levels: Use a TDS (Total Dissolved Solids) or EC (Electrical Conductivity) meter to monitor the nutrient levels in your solution. This will help you maintain the correct concentration for your plants.
Step 3: Check and Adjust pH Levels
Maintaining the correct pH level is crucial for nutrient absorption. If the pH is too high or too low, your plants may not be able to absorb nutrients properly, leading to nutrient burn.
- For Soil: The ideal pH range for most plants grown in soil is between 6.0 and 7.0. Test the pH of your soil and adjust it using pH adjusters (lime to raise pH, sulfur to lower pH) as needed.
- For Hydroponics: In hydroponic systems, the optimal pH range is typically between 5.5 and 6.5. Test the pH regularly and adjust using pH up or down solutions.
Step 4: Prune Damaged Leaves
Once the excess nutrients have been flushed and the nutrient levels adjusted, it’s important to remove any damaged or dead leaves. This helps the plant focus its energy on new, healthy growth and prevents further stress.
- Use clean, sharp scissors or pruning shears to carefully trim away the burnt leaf tips or fully damaged leaves.
- Be cautious not to remove too much foliage at once, as this can shock the plant.
Step 5: Monitor Plant Recovery
After flushing and adjusting nutrient levels, closely monitor your plants for signs of recovery. New growth should appear healthy, and existing leaves should stop showing signs of burn. If symptoms persist, you may need to flush the soil again or further adjust nutrient levels.
4. How to Prevent Nutrient Burn
Preventing nutrient burn is easier than fixing it. By following these preventive measures, you can avoid nutrient burn and keep your plants healthy:
- Use Proper Fertilizer Strength: Always follow the recommended dosage on fertilizer labels and avoid using too strong of a solution, especially for young plants.
- Gradually Increase Nutrient Levels: When introducing new nutrients or increasing the strength, do so gradually to allow your plants to adjust.
- Maintain Proper pH: Regularly test the pH of your soil or hydroponic solution to ensure nutrients are being absorbed properly.
- Water Properly: Avoid over-watering or under-watering, as this can impact how plants absorb nutrients. Make sure the soil drains well to prevent nutrient buildup.
Conclusion: Bring Your Plants Back to Health
Nutrient burn can be alarming, but with the right care, your plants can recover. By flushing the growing medium, adjusting nutrient levels, and maintaining proper pH and watering practices, you can fix nutrient burn and restore your plants to full health. Consistent monitoring and balanced feeding will help prevent nutrient burn in the future, ensuring your plants thrive.
Frequently Asked Questions
- Can nutrient burn be reversed? While the damage to leaves can’t be reversed, you can stop nutrient burn from spreading by flushing the soil and adjusting nutrient levels. New growth should appear healthy once the issue is corrected.
- How long does it take for plants to recover from nutrient burn? Recovery time depends on the severity of the nutrient burn and the plant’s health. It can take a few days to a few weeks for new, healthy growth to appear.
- Should I prune all damaged leaves? You should prune severely damaged or dead leaves, but avoid removing too much foliage at once to prevent further stress on the plant.
