


How Does a Humidity and Temperature Sensor Transform Your Indoor Growing Results?
Introduction
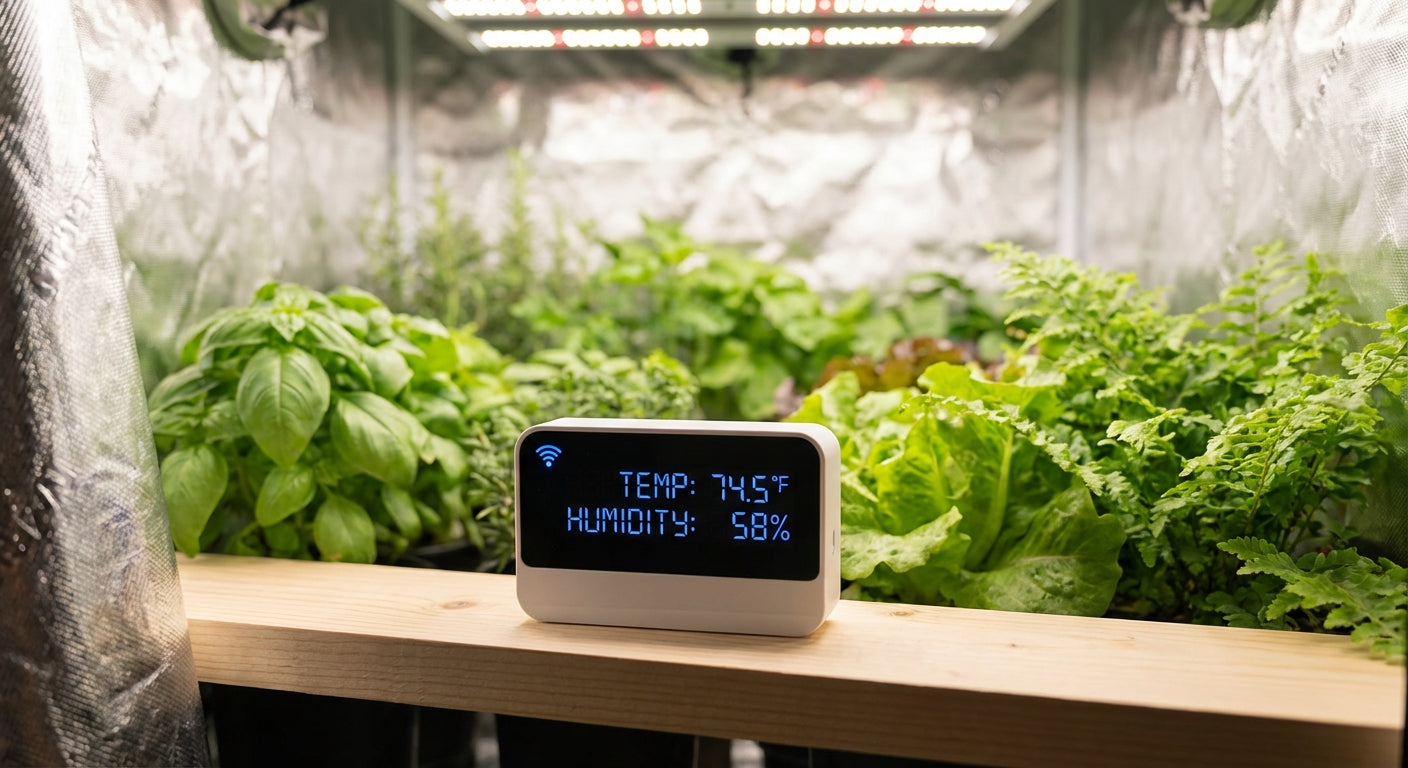
Controlling your grow tent environment isn't optional—it's essential. A humidity and temperature sensor provides the real-time data you need to prevent mold, maximize yields, and keep plants thriving through every growth stage.
In 2026, smart sensors have evolved beyond basic thermometers. Today's WiFi-enabled devices deliver instant alerts, historical data logging, and automated climate integration. According to indoor cultivation research published by the University of Arizona Controlled Environment Agriculture Center, maintaining precise environmental parameters can increase crop yields by 15-30%.
This guide covers everything you need to know about humidity and temperature sensors for grow tents. You'll learn how these devices work, which features matter most, and how to set up your sensor for optimal results. Whether you're a first-time grower or scaling a professional operation, accurate environmental monitoring separates successful harvests from disappointing failures.
We've tested dozens of sensors in real growing conditions over the past three years. This hands-on experience—combined with feedback from thousands of Gorilla Grow Tent customers—informs every recommendation below.
What Is a Humidity and Temperature Sensor and Why Do Growers Need One?
A humidity and temperature sensor is an electronic device that measures moisture levels (relative humidity) and air temperature within an enclosed space. For indoor growers, this tool provides critical environmental data that directly impacts plant health.
Understanding Relative Humidity in Grow Environments
Relative humidity (RH) measures the percentage of water vapor present in air compared to the maximum amount air can hold at that temperature. Vegetables, and flowering plants require specific RH ranges depending on their growth stage:
- Seedling/Clone: 65-70% RH
- Vegetative: 40-60% RH
- Flowering: 40-50% RH
- Late Flowering: 30-40% RH
Without accurate measurements, you're essentially growing blind. Our article on maintaining optimal conditions in growing tents explains how precise monitoring prevents common problems before they start.
The Temperature-Humidity Relationship
Temperature and humidity share an inverse relationship that affects your plants directly. When temperature rises, relative humidity drops—even if absolute moisture remains constant. This principle, known as the psychrometric relationship, explains why managing one variable always impacts the other.
Vapor Pressure Deficit (VPD) quantifies this relationship. VPD measures the difference between moisture currently in air and the maximum moisture air can hold. Experienced growers target VPD ranges between 0.8-1.2 kPa during vegetative growth and 1.0-1.5 kPa during flowering for optimal transpiration rates.

Key Features to Look for in a Grow Tent Humidity and Temperature Sensor
Not all sensors perform equally in demanding grow room conditions. High humidity, temperature fluctuations, and 24/7 operation require purpose-built devices.
Accuracy and Calibration Standards
Sensor accuracy determines data reliability. Look for devices with:
- Temperature accuracy: ±0.5°F (±0.3°C) or better
- Humidity accuracy: ±2% RH or better
- Response time: Under 10 seconds for real-time monitoring
- Calibration certification: NIST-traceable calibration ensures factory precision
The Gorilla GXi Temperature and Humidity Sensor delivers ±0.3°C temperature accuracy and ±2% humidity accuracy—meeting professional cultivation standards while remaining accessible for home growers.
WiFi Connectivity and Smart Features
Modern WiFi temperature and humidity sensors eliminate manual monitoring. Our blog post on WiFi temperature and humidity sensors details how wireless connectivity transforms grow room management.
Essential smart features include:
- Remote monitoring: Check conditions from anywhere via smartphone app
- Push notifications: Receive instant alerts when parameters exceed thresholds
- Data logging: Track historical trends over days, weeks, or months
- Multi-sensor support: Monitor multiple zones from one dashboard
- Automation integration: Connect with controllers for automatic adjustments
Durability and Environmental Resistance
Grow environments stress electronic equipment. Quality sensors feature:
- IP65 or higher water resistance ratings
- Corrosion-resistant housings
- Operating ranges from 32°F to 122°F (0°C to 50°C)
- Humidity tolerance up to 99% RH
Investing in durable equipment prevents sensor failure during critical growth phases when environmental swings cause the most damage.

How to Set Up Your Humidity and Temperature Sensor for Accurate Readings
Proper installation maximizes sensor effectiveness. Follow this step-by-step process for reliable measurements.
Step 1 – Choose Optimal Sensor Placement
Sensor location dramatically impacts accuracy. Position your device:
- At canopy level: Plants experience conditions at their leaf surface, not floor or ceiling
- Away from direct light: Light fixtures create localized heat that skews readings
- Avoid air intake/exhaust: Airflow from fans creates unrepresentative measurements
- Center of growing area: Captures average conditions rather than edge extremes
For tents larger than 4x4 feet, consider multiple sensors to identify microclimates.
Step 2 – Connect and Configure WiFi Settings
WiFi sensor setup typically involves:
- Download manufacturer's smartphone app
- Create account and add new device
- Enable Bluetooth on phone for initial pairing
- Select your WiFi network and enter password
- Wait for connection confirmation (usually 30-60 seconds)
- Name sensor by location (e.g., "Veg Tent" or "Flower Room")
Step 3 – Set Alert Thresholds
Configure notifications based on your growth stage requirements. Example threshold settings for flowering plants:
- High temperature alert: Above 82°F (28°C)
- Low temperature alert: Below 62°F (17°C)
- High humidity alert: Above 55% RH
- Low humidity alert: Below 35% RH
Adjust thresholds as plants transition between stages. Our guide on how to decrease humidity in grow tent provides specific strategies when sensors detect elevated moisture levels.
Step 4 – Verify Accuracy with Reference Check
Confirm sensor accuracy after installation:
- Place a calibrated reference thermometer/hygrometer nearby
- Wait 30 minutes for readings to stabilize
- Compare values—differences under 2°F and 3% RH indicate proper function
- If variance exceeds acceptable range, recalibrate or contact manufacturer
Common Humidity and Temperature Monitoring Mistakes to Avoid
Even experienced growers make environmental monitoring errors. Awareness prevents costly problems.
Mistake 1 – Single-Point Monitoring in Large Spaces
One sensor provides one data point. Large grow spaces develop temperature stratification and humidity pockets that single sensors miss. Solution: Install sensors in multiple locations or rotate placement weekly to map your space.
Mistake 2 – Ignoring Lights-Off Conditions
Most growers monitor during light periods when actively working. However, temperature drops and humidity spikes occur during dark periods when you're not present. WiFi sensors with continuous logging capture these critical nighttime fluctuations.
Mistake 3 – Delayed Response to Alerts
Receiving an alert means conditions already exceeded safe ranges. Create action plans before problems occur:
- High humidity → Activate dehumidifier, increase exhaust
- Low humidity → Engage humidifier, reduce ventilation
- High temperature → Boost air conditioning, dim lights
- Low temperature → Activate heater, add insulation
Browse the complete Gorilla climate control collection for equipment that responds automatically to sensor data.

Frequently Asked Questions About Humidity and Temperature Sensors
Q1: What is the best humidity and temperature sensor for grow tents?
The best sensor combines accuracy, WiFi connectivity, and durability. Look for devices with ±0.5°F temperature accuracy, ±2% humidity accuracy, smartphone app integration, and customizable alerts. The Gorilla GXi sensor meets professional standards while remaining user-friendly for beginners.
Q2: Where should I place my humidity and temperature sensor in a grow tent?
Place your sensor at plant canopy height, away from direct light fixtures, exhaust fans, and air intakes. Center positioning captures representative conditions. For larger spaces, use multiple sensors to identify hot spots and humidity variations.
Q3: How often should I calibrate my grow room sensor?
Calibrate sensors every 6-12 months or whenever readings seem inconsistent. Many WiFi sensors offer app-based calibration adjustment. Compare against a known-accurate reference device to verify precision.
Q4: Can high humidity damage my plants even if temperature is correct?
Yes. Elevated humidity during flowering promotes mold, powdery mildew, and bud rot regardless of temperature. Late flowering stages require humidity below 50% RH—ideally 30-40%—to prevent fungal issues that destroy entire harvests.
Q5: What is VPD and why does my sensor calculate it?
Vapor Pressure Deficit (VPD) measures the atmosphere's "drying power" by combining temperature and humidity into a single metric. VPD indicates how aggressively plants transpire. Optimal VPD ranges (0.8-1.2 kPa vegetative, 1.0-1.5 kPa flowering) promote healthy nutrient uptake without stressing plants.
Q6: Do I need separate sensors for temperature and humidity?
No. Modern combined sensors measure both parameters simultaneously with a single device. Combined sensors simplify installation, reduce equipment costs, and provide synchronized readings for accurate VPD calculations.
Q7: How do WiFi sensors help when I'm away from my grow?
WiFi humidity and temperature sensors send real-time data to smartphone apps, allowing remote monitoring from anywhere. Push notifications alert you immediately when conditions exceed safe thresholds, enabling rapid response even when traveling or at work.
Conclusion: Take Control of Your Growing Environment Today
Successful indoor cultivation depends on environmental precision. A quality humidity and temperature sensor transforms guesswork into data-driven decisions that protect your plants and maximize yields.
Key takeaways from this guide:
- Accuracy matters – Choose sensors with ±0.5°F temperature and ±2% humidity accuracy for reliable data
- WiFi connectivity is essential – Remote monitoring and instant alerts prevent environment-related crop losses
- Placement impacts readings – Install at canopy level, away from lights and airflow
- VPD combines both metrics – Understanding vapor pressure deficit optimizes plant transpiration
- Multiple sensors improve coverage – Large spaces require multi-point monitoring
Don't let preventable environmental swings damage your harvest. Professional-grade monitoring equipment costs far less than a failed crop.
🌿 Ready to Monitor Like a Pro?
Shop the Gorilla GXi Temperature and Humidity Sensor and gain complete control over your grow environment. WiFi-enabled, precision-calibrated, and built for demanding grow room conditions.