How to Set Up Inline Fan in Your Grow Tent: Complete 2025 Installation Guide
Setting up an inline fan correctly is the foundation of successful indoor growing. Poor ventilation leads to heat buildup, humidity problems, stagnant air, and ultimately crop failure. Whether you're installing your first grow tent ventilation system or upgrading an existing setup, this comprehensive guide walks you through every step of proper inline fan installation for optimal plant health and maximum yields.
Quick Answer: To set up an inline fan in your grow tent: 1) Calculate required CFM based on tent volume, 2) Position the carbon filter at the top inside the tent, 3) Connect the inline fan outside the tent via ducting, 4) Route exhaust ducting away from intake areas, 5) Seal all connections to prevent air leaks. Proper installation ensures optimal temperature, humidity, and air circulation for healthy plant growth.
Understanding Inline Fans and Their Critical Role
Inline duct fans serve as the heart of your grow tent's ventilation system, performing multiple essential functions that directly impact plant health and yield potential. These specialized centrifugal fans integrate seamlessly into ducting systems, creating powerful airflow while maintaining relatively quiet operation.
The primary functions of an inline fan in your grow tent include:
- Air exchange: Removing stale, CO2-depleted air and bringing in fresh air
- Temperature control: Exhausting heat generated by grow lights and equipment
- Humidity management: Reducing excess moisture that can lead to mold and disease
- Odor control: When paired with carbon filters, eliminating plant odors
- Air circulation: Creating airflow that strengthens plant stems and prevents pest issues
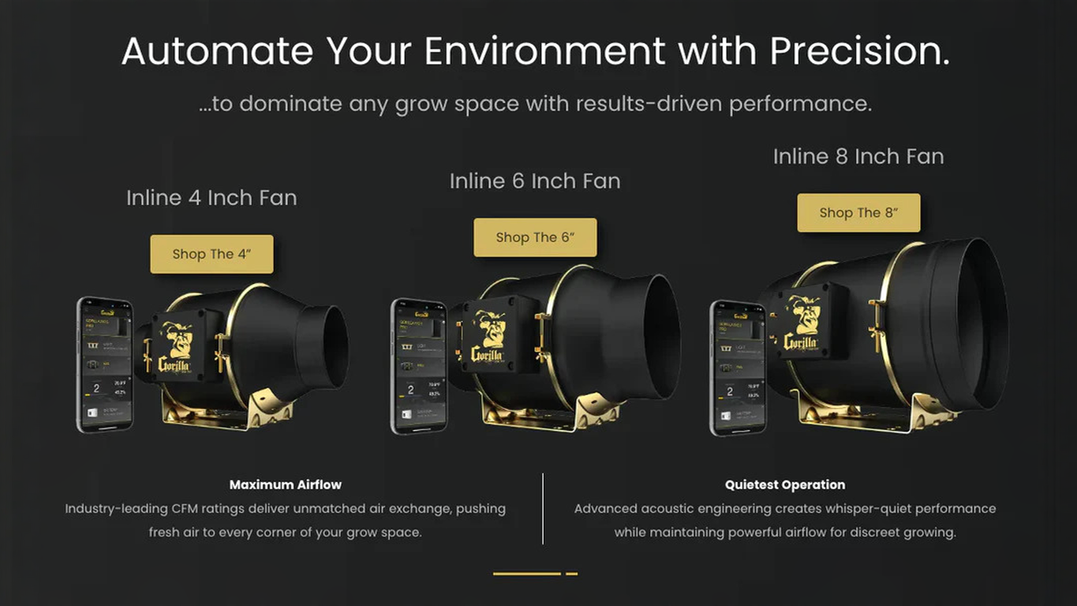
Modern inline fans have evolved significantly, with advanced models like the Gorilla GXi series offering smart automation, whisper-quiet operation, and smartphone control through dedicated apps.

Calculating the Right Fan Size for Your Setup
Proper fan sizing is crucial for effective ventilation. An undersized fan won't provide adequate air exchange, while an oversized fan creates excessive noise and energy consumption. Here's how to calculate your exact CFM requirements:
Basic CFM Calculation Formula
Step 1: Calculate tent volume Volume = Length × Width × Height
Step 2: Determine base CFM requirement For optimal air exchange, replace all air in your tent every 1-3 minutes. Most growers aim for complete air exchange every minute, so: Base CFM = Tent Volume ÷ Minutes
CFM Adjustment Factors
Real-world conditions require adjusting your base CFM calculation for various factors:
Carbon Filter Resistance: Add 25-60% depending on filter size and quality Ducting Losses: Add 10-20% for each 10 feet of ducting and each bend Light Heat: Add 10-50% based on lighting type and wattage Ambient Conditions: Add 10-25% for warm climates or poor air circulation
Practical Example: 4x4 Grow Tent
For a standard Gorilla 4x4 grow tent (4' × 4' × 6'11"):
- Volume: 4 × 4 × 6.92 = 110.72 cubic feet
- Base CFM: 110.72 CFM (for 1-minute air exchange)
- With adjustments: 110.72 × 1.4 (carbon filter) × 1.15 (ducting) × 1.2 (light heat) = 213 CFM
- Safety margin: 213 × 1.25 = 266 CFM minimum
This calculation indicates a 6-inch fan rated for 300-400 CFM would be ideal for most 4x4 setups.
Essential Equipment for Inline Fan Installation
Core Components
Inline Duct Fan: Choose appropriate size based on your CFM calculations. Popular sizes include:
- 4-inch fans: 100-200 CFM for small tents (2x2, 2x4)
- 6-inch fans: 200-500 CFM for medium tents (3x3, 4x4)
- 8-inch fans: 400-800+ CFM for large tents (5x5 and above)
Carbon Filter: Essential for odor control. Gorilla carbon filters feature premium coconut shell carbon with up to 50% more surface area than competitors.
Flexible Ducting: Match ducting diameter to your fan size. Use insulated ducting to reduce noise and prevent condensation.
Duct Clamps: Secure all connections to prevent air leaks that reduce efficiency.
Supporting Accessories
Fan Speed Controller: Allows precise airflow adjustment for different growth stages and environmental conditions.
Duct Muffler/Silencer: Reduces noise transmission through ducting systems.
Hygrometer/Thermometer: Monitor environmental conditions to optimize fan operation.
Timer Controls: Automate fan operation schedules for lights-on and lights-off periods.
Step-by-Step Installation Process
Phase 1: Planning Your Ventilation Layout
Before installing any equipment, plan your complete ventilation system:
Airflow Direction: Design for negative pressure with more air being exhausted than drawn in. This prevents odors from escaping through unfiltered openings.
Component Placement:
- Carbon filter: Inside tent at the highest point where heat and odors accumulate
- Inline fan: Can be inside or outside tent; outside placement reduces noise
- Intake vents: Bottom of tent for cool, fresh air entry
- Exhaust outlet: Route away from intake to prevent air recirculation
Ducting Route: Plan the shortest, straightest path possible. Each bend reduces efficiency by 10-25%.
Phase 2: Installing the Carbon Filter
Positioning: Mount the carbon filter at the top of your tent using adjustable hangers or rope ratchets. Position it centrally for optimal air collection.
Orientation: Ensure airflow direction arrows on the filter align with your planned airflow path.
Clearance: Leave at least 6 inches of space around the filter for unrestricted air intake.
Pre-filter Installation: Attach the included pre-filter sleeve to extend carbon filter life by capturing larger particles.
Phase 3: Inline Fan Installation
Location Decision: Installing the fan outside the tent reduces noise and frees up growing space, but requires weatherproofing if placed in unheated areas.
Mounting Method:
- Inside tent: Use adjustable hangers with vibration dampening
- Outside tent: Mount on solid surface or use isolation hangers
Airflow Direction: Verify the fan's airflow direction arrows align with your system design. Most inline fans can be reversed if needed.
Connection Sequence: Connect the fan between the carbon filter and exhaust outlet: Filter → Fan → Exhaust
Phase 4: Ducting Installation
Measuring and Cutting: Measure ducting lengths precisely and cut with sharp knife for clean edges.
Connection Method:
- Slide duct clamp onto ducting
- Push ducting firmly onto component (filter, fan, or port)
- Position clamp over the overlap
- Tighten clamp securely
Avoiding Restrictions: Keep ducting as straight as possible. When bends are necessary, use gradual curves rather than sharp angles.
Sealing Ports: Use the tent's built-in ducting ports. Gorilla grow tents feature double-cinching ports that create tight, light-proof seals.
Phase 5: Final Connections and Testing
Electrical Connections: Connect the fan to power source, speed controller (if used), and timer controls.
Air Leak Testing: With the system running, check all connections for air leaks using smoke or tissue paper.
Performance Verification: Monitor temperature and humidity for 24-48 hours to ensure proper environmental control.
Noise Assessment: Check noise levels and adjust mounting or add dampening materials if necessary.
Optimizing Your Ventilation System
Creating Proper Airflow Patterns
Intake Placement: Position passive intake vents or fans near the bottom of your tent. Cool air naturally flows upward, creating natural circulation patterns.
Air Distribution: Use internal circulation fans to eliminate dead spots and ensure even air movement across all plants.
Exhaust Positioning: Place exhaust ports at the highest point where hot air accumulates. This utilizes natural convection to enhance fan efficiency.
Managing Environmental Conditions
Temperature Control: Maintain optimal growing temperatures (70-78°F during lights-on, 65-70°F during lights-off) through proper ventilation timing and speed control.
Humidity Management: Adjust fan speeds to maintain proper humidity levels:
- Vegetative stage: 55-60% relative humidity
- Flowering stage: 45-50% relative humidity
- Late flowering: 40-45% relative humidity
CO2 Considerations: Excessive ventilation can remove supplemental CO2 before plants can utilize it. Balance air exchange with CO2 supplementation schedules.
Noise Reduction Strategies
Vibration Isolation: Use rubber mounts, elastic hangers, or neoprene isolators to prevent vibration transmission to tent structure.
Acoustic Ducting: Insulated ducting reduces noise transmission and prevents condensation.
Fan Speed Management: Running fans at 70-80% capacity rather than full speed significantly reduces noise while maintaining adequate airflow.
Strategic Placement: Positioning fans outside tents and using longer ducting runs can reduce noise in living spaces.
Advanced Setup Configurations
Smart Automation Integration
Modern inline fans offer sophisticated automation capabilities that optimize growing conditions:
Environmental Triggers: Automatically adjust fan speeds based on temperature and humidity readings.
Light Synchronization: Coordinate ventilation with lighting schedules for different day/night requirements.
Remote Monitoring: Smart fans enable monitoring and control via smartphone apps, allowing adjustments from anywhere.
Multi-Fan Systems
Larger operations often benefit from multiple fan configurations:
Primary/Secondary Setup: Use a larger primary fan for main air exchange and smaller secondary fans for targeted circulation.
Intake/Exhaust Balance: Active intake fans ensure adequate fresh air supply, especially in sealed growing environments.
Zone Ventilation: Different areas of large tents may require independent climate control through multiple smaller fans.
Integration with Other Systems
Air Conditioning Coordination: Integrate ventilation with HVAC systems for precise climate control in extreme conditions.
Dehumidification Support: Coordinate fan operation with standalone dehumidifiers for optimal humidity control.
CO2 Supplementation: Time fan operation to work with CO2 injection systems for maximum efficiency.

Troubleshooting Common Installation Issues
Air Circulation Problems
Insufficient Airflow: Often indicates undersized fans or excessive system resistance. Check CFM calculations and remove unnecessary ducting restrictions.
Hot Spots: Uneven temperatures suggest poor air distribution. Add circulation fans or adjust ducting to improve airflow patterns.
Humidity Issues: Persistent high humidity may require larger fans, additional dehumidification, or improved air exchange rates.
Noise and Vibration Issues
Excessive Fan Noise: Usually caused by fans running at maximum speed or poor mounting. Install speed controllers and vibration dampeners.
Ducting Noise: Airflow turbulence in undersized or kinked ducting creates noise. Use properly sized, straight ducting runs.
Structural Vibration: Vibrations transmitted through tent frames can amplify noise. Use isolation mounts and flexible connections.
System Efficiency Problems
Poor Temperature Control: Inadequate cooling suggests insufficient CFM or poor airflow design. Recalculate requirements and optimize layout.
Odor Escape: Usually indicates air leaks, saturated carbon filters, or inadequate negative pressure. Check all connections and replace filters as needed.
Energy Consumption: High electricity usage often results from oversized fans or poor system design. Right-size equipment and optimize for efficiency.
Maintenance and Long-term Performance
Regular Maintenance Schedule
Weekly Tasks:
- Check environmental conditions and system performance
- Inspect ducting connections for air leaks
- Clean intake vents and pre-filters
Monthly Tasks:
- Deep clean fan blades and housing
- Check and tighten all mounting hardware
- Monitor carbon filter performance
Quarterly Tasks:
- Replace pre-filters and check carbon filter condition
- Calibrate environmental monitoring equipment
- Inspect electrical connections and controls
Component Replacement Guidelines
Carbon Filters: Replace every 6-12 months depending on usage and plant varieties. Gorilla carbon filters include replacement indicators for optimal timing.
Ducting: Replace annually or when damaged. UV exposure and repeated handling can degrade flexible ducting.
Fan Motors: Quality inline fans typically last 3-5 years with proper maintenance. Monitor for increased noise or reduced performance.
Performance Optimization
Seasonal Adjustments: Modify fan speeds and operation schedules based on changing ambient conditions throughout the year.
Growth Stage Adaptation: Adjust ventilation for different plant growth phases—seedlings require gentler airflow than mature plants.
Equipment Upgrades: As growing operations expand, upgrade to larger fans or add supplementary ventilation components.
Cost Analysis and Investment Planning
Initial Setup Costs
Basic 4x4 Setup: $200-400 for quality fan, carbon filter, and ducting Advanced Smart System: $400-800 including automation and monitoring Professional Installation: Additional $200-500 for complex setups
Operating Costs
Electrical Consumption: Modern EC motor fans use 30-50% less energy than traditional AC motors Filter Replacement: Budget $50-150 annually for carbon filter replacement Maintenance Supplies: $20-50 annually for ducting, clamps, and cleaning supplies
Return on Investment
Proper ventilation investment typically pays for itself through:
- Increased yields: 15-30% higher harvests with optimal environmental control
- Crop protection: Preventing losses from heat stress, mold, or pest issues
- Equipment longevity: Protecting expensive grow lights and other equipment
Frequently Asked Questions
Where should I place my inline fan in the ventilation system?
Position the inline fan between the carbon filter and exhaust outlet. The fan pulls air through the filter and pushes it out of the tent. Installing the fan outside the tent reduces noise and frees up growing space.
How do I know if my inline fan is powerful enough?
Monitor your tent's temperature and humidity levels. If temperatures consistently exceed optimal ranges or humidity stays too high, your fan may be undersized. A properly sized fan should maintain stable conditions with 20-30% capacity in reserve.
Can I use a regular household fan instead of an inline fan?
Regular fans aren't designed for ducted systems and lack the pressure capabilities needed for effective grow tent ventilation. Inline fans are specifically engineered for moving air through carbon filters and ducting with minimal noise.
How often should I run my inline fan?
Most growers run exhaust fans continuously during lights-on periods and reduce speeds during lights-off. Advanced smart fans can automatically adjust based on environmental conditions.
What size inline fan do I need for my grow tent?
Fan size depends on tent volume, lighting heat, and accessories. Use the CFM calculation method: tent volume × air exchanges per minute × adjustment factors. Most 4x4 tents need 6-inch fans rated 300-500 CFM.
Summary
Proper inline fan installation is essential for successful indoor growing, requiring careful planning, correct sizing, and professional installation techniques. Calculate your CFM requirements based on tent volume and adjustment factors. Position components for optimal airflow with the carbon filter inside and fan outside when possible. Use quality ducting and secure all connections to prevent air leaks. Monitor performance and maintain equipment regularly for long-term success. Investment in proper ventilation protects your entire growing operation and maximizes yield potential.
Ready to Install Your Perfect Ventilation System?
Transform your grow tent into a precisely controlled environment with Gorilla's complete ventilation solutions. From industry-leading carbon filters to whisper-quiet inline fans, Gorilla provides the professional-grade equipment needed for optimal plant health and maximum yields. Explore complete grow tent kits that include perfectly matched ventilation components, or browse individual components to upgrade your existing setup. Every Gorilla product includes expert support and installation guidance to ensure your growing success.
Related Articles:

Lena Myles
I'm a mushroom enthusiast and home cook based in Oregon. I'm passionate about foraging and creating fungi-focused recipes, especially delicious, plant-based dishes using gourmet mushrooms like trumpet, shiitake, and oyster. When I’m not in the kitchen, you’ll usually find me wandering the woods in search of new wild flavors.


