


How to Set Up Your Growing Tent: A Beginner-Friendly Installation Guide
Setting up your first growing tent might seem overwhelming, but it doesn't have to be. With the right preparation and step-by-step approach, you'll have a fully functional indoor garden ready to go in just a few hours.
Whether you've just unboxed your Gorilla Grow Tent or you're planning your first purchase, this guide walks you through every stage of setup. From assembling the frame to installing ventilation and lighting, you'll learn exactly what to do for a successful grow tent installation.
Let's transform that box of components into your thriving indoor garden space!
Before You Begin: Essential Preparation Steps
Proper preparation makes the setup process smooth and prevents common mistakes. Here's what you need to do before opening your grow tent box.
Choose the Perfect Location
Your grow tent's location significantly impacts your growing success. Select a spot that offers adequate space, electrical access, and temperature stability. Basements, spare bedrooms, closets, and garages are popular choices for most growers.
Make sure you have at least three feet of clearance on all sides during assembly. This working space makes the process much easier and allows proper airflow around the tent once operational. Consider proximity to water sources for convenient watering and access to windows or ventilation points for exhaust.
Gather Your Tools and Equipment
Most grow tents require minimal tools for assembly. You'll typically need a level surface, possibly a rubber mallet for securing poles, and scissors or a knife for opening packaging. The Gorilla Grow Tent kit comes with everything you need for the tent itself, but you'll want to have your lighting, ventilation, and growing supplies ready nearby.

Clear and Prepare Your Space
Clean the area thoroughly before starting. Sweep or vacuum to remove dust and debris that could contaminate your growing environment later. If you're setting up on concrete or a hard floor, consider placing a waterproof mat underneath to protect your floor from potential spills.
Take a moment to plan your electrical setup. You'll need outlets for lights, fans, and possibly other equipment. Extension cords work in a pinch, but dedicated outlets are safer and more reliable for continuous operation.
Step 1: Assemble the Frame Foundation
The frame is the backbone of your growing tent. Proper assembly ensures stability and longevity.
Build the Base Frame
Start by identifying the base poles. These are usually labeled as "A" poles in your instruction manual. Connect the straight poles using the corner connectors, paying attention to the "up" orientation typically indicated on the connectors.
Form the complete rectangle or square base by connecting all bottom poles. For a 2x4 tent, you'll create a rectangle; for a 4x4 tent, a square. Before proceeding, measure the assembled base to verify it matches your tent's specifications. This simple check prevents issues later.
Add Vertical Support Poles
Connect vertical support poles to each corner of the base frame. These poles should fit snugly into the corner connectors and stand straight up. Many growers find it helpful to have a second person hold the vertical poles steady while securing them, especially for larger tents.
As you add vertical poles, ensure they're fully seated in the connectors. A partial connection can lead to instability or collapse once you add weight from lights and other equipment.
Install Cross Bars and Top Frame
Add horizontal cross bars at the top of your tent. These crucial support beams hold your grow lights, carbon filters, and other hanging equipment. The Gorilla Grow Tent features an all-metal interlocking frame that supports up to 300 pounds, giving you plenty of capacity for heavy-duty equipment.
Connect the top frame pieces to complete the skeleton of your tent. Double-check that all connections are secure and the frame sits level on your floor. A properly assembled frame should feel rock-solid and show no wobbling.
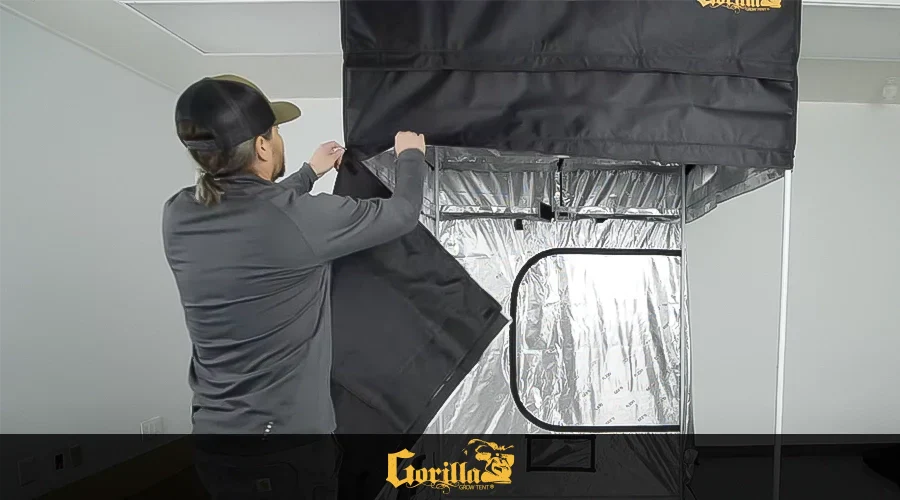
Step 2: Install the Canvas Cover
With your frame complete, it's time to add the protective canvas that creates your controlled environment.
Position the Canvas Correctly
Unfold the canvas completely and spread it out near your assembled frame. Identify which end is the top (usually where the roof section is) and which sides have doors. Getting this orientation right from the start saves frustration later.
Position the frame in the center of the unfolded canvas. This gives you equal amounts of fabric on all sides to work with during installation.
Secure the Roof Section First
Begin by pulling the roof section over the top frame. Work gradually, guiding each corner of the roof over each corner of the frame a little at a time. Don't try to fully seat one corner and then stretch to the others – this approach can damage the fabric or connectors.
Work methodically around the perimeter, allowing plenty of slack as you go. The thick 1680D canvas used in quality grow tents is extremely durable but shouldn't be forced. If you encounter resistance, reposition rather than pulling harder.
Pull Down and Secure Side Panels
Carefully pull the side panels down over the vertical poles. Work from top to bottom, ensuring the fabric isn't twisted or caught on any connectors. Many tents have reinforced corner pockets where tent poles should seat securely.
Zip up all doors and windows as you finish covering the frame. This helps maintain tension and shape in the canvas. For detailed visual guidance, check out our comprehensive how to set up Gorilla Grow Tent video tutorial.

Step 3: Set Up Ventilation and Airflow
Proper ventilation is absolutely critical for plant health. Without adequate airflow, your plants will struggle with heat, humidity, and stagnant air problems.
Install Your Carbon Filter
Position your carbon filter at the top inside the tent. Heat and odors naturally rise, so top placement provides maximum efficiency. The Gorilla Carbon Filter features premium coconut shell carbon with superior odor control capacity.
Attach the filter using adjustable hanging straps from the top crossbars. Make sure it's secure but can be adjusted if needed. Leave enough space above the filter to attach ducting without creating sharp bends that restrict airflow.
Connect Your Inline Fan
Your inline fan is the heart of your ventilation system. It should be positioned after the carbon filter in the airflow path. You can mount it inside or outside the tent depending on space and noise considerations.
For a 4x4 tent, you'll typically need a 6-inch fan with 250-350 CFM capacity. Learn more about proper sizing in our guide on what size inline fan for 4x4 grow tent requirements.
Connect the fan's intake side to your carbon filter using flexible ducting and secure with clamps. Check the fan housing for directional arrows indicating proper airflow direction. These arrows should point toward your exhaust port.
Route Exhaust Ducting
Run ducting from your fan's output through one of the tent's ducting ports to your exhaust destination. Keep ducting as short and straight as possible for maximum efficiency. Each bend or length of ducting reduces airflow by creating resistance.
Use the double-cinching ports found on quality tents to create a tight seal around your ducting. This prevents light leaks and maintains negative pressure inside the tent.
Add Internal Circulation Fans
In addition to exhaust ventilation, you need internal air circulation. Mount one or two oscillating clip-on fans inside the tent to keep air moving around your plants. Position them to create gentle movement across the canopy without directly blasting plants.
For complete details on fan setup, explore our complete guide to setting up inline fans with professional tips and troubleshooting advice.
Step 4: Install Lighting System
Lighting is where your plants get their energy. Proper installation ensures even coverage and optimal growth.
Choose Proper Hanging Height
LED grow lights should initially hang 18-24 inches above where your plant canopy will be. This distance prevents light burn while providing adequate intensity. You'll adjust this height as plants grow, so use adjustable rope ratchets or chain hangers for easy repositioning.
Secure Lights to Frame
Attach your light's hanging hardware to the top crossbars of your tent frame. Distribute weight evenly across multiple attachment points when possible. Even though Gorilla frames support up to 300 pounds, proper weight distribution extends the life of your equipment.
Ensure lights are level and provide even coverage across your entire growing area. For a 4x4 space, a single quality LED in the 400-600 watt range typically provides adequate coverage.
Connect to Timers
Plug your grow lights into an automatic timer to maintain consistent light cycles. Most plants need 18-24 hours of light during vegetative growth and 12 hours during flowering. Consistent timing is crucial for plant health and development.

Step 5: Set Up Environmental Controls
Monitoring and controlling your environment separates successful grows from struggling ones.
Install Temperature and Humidity Monitors
Place a digital thermometer and hygrometer inside your tent at plant canopy level. This positioning gives you accurate readings of the conditions your plants actually experience. Many growers use monitors with remote displays so they can check conditions without opening the tent.
Ideal temperatures range from 72-82°F during lights-on and 65-75°F during lights-off periods. Humidity should be 50-60% during vegetative growth and 40-50% during flowering.
Position Sensors Strategically
If using smart controllers or automation systems, position sensors away from direct light or fan airflow. These heat sources can give false readings and trigger incorrect environmental adjustments. Mount sensors at plant level for most accurate data.
Test Your Environmental Systems
Before adding plants, run your entire system for 24-48 hours. Monitor temperatures, humidity levels, and airflow to ensure everything works properly. This test period allows you to make adjustments without risking plant health.
Check for light leaks by turning off all lights in the surrounding room and zipping the tent completely closed. Any light entering the tent during this test needs to be sealed to prevent disrupting plant dark cycles later.
Step 6: Final Touches and Organization
These finishing details make your growing experience more convenient and successful.
Install Floor Protection
Place the removable floor tray if your tent includes one. This waterproof barrier protects your floor from spills and makes cleanup easy. If your tent didn't include a tray, consider adding a grow tent accessory tray or using a waterproof mat.
Organize Cable Management
Route all electrical cables neatly through designated port holes. Use cable ties or clips to bundle cords together and keep them organized. Good cable management reduces trip hazards and makes it easier to troubleshoot equipment issues later.
Add Convenience Features
Consider adding helpful accessories like a tool pouch for scissors and meters, gear boards for organizing equipment, or a High CFM Kit if you're using powerful exhaust fans that create negative pressure.
Create a Maintenance Schedule
Before you start growing, create a simple schedule for checking your tent. Daily tasks include checking temperature and humidity, while weekly tasks might include inspecting for pests and adjusting equipment. Monthly tasks typically involve cleaning filters and checking all connections.
Common Setup Mistakes to Avoid
Learning from others' mistakes saves time and frustration. Here are the most common setup errors and how to avoid them.
Undersized Ventilation
Many beginners underestimate ventilation needs. Calculate your CFM requirements based on tent volume and add 25-30% extra capacity if using a carbon filter. Undersized fans can't adequately control temperature and humidity, leading to plant stress and disease.
Poor Light Positioning
Hanging lights too close causes light burn, while too far reduces effectiveness. Start at the recommended distance and watch your plants carefully for signs of stress. Leaves cupping upward or bleaching indicate lights are too close.
Skipping the Test Run
Always run your complete system for at least 24 hours before adding plants. This reveals issues with temperature control, light leaks, or equipment problems that are much easier to fix without plants present.
Inadequate Airflow
Having exhaust without internal circulation creates dead spots where air stagnates. Always include oscillating fans to keep air moving throughout the entire tent volume.
Troubleshooting Common Setup Issues
Even with careful setup, you might encounter these common challenges.
Tent Walls Sucking In
Strong exhaust fans create negative pressure that pulls tent walls inward. This reduces growing space and can restrict airflow. The solution is either reducing fan speed or installing support poles like the High CFM Kit to maintain wall structure.
Light Leaks
Small gaps at zippers or ports can disrupt plant dark cycles. Fix leaks using light-proof tape or by adjusting how ducting sits in ports. Remember that even small amounts of light during dark periods can cause problems, especially during flowering.
Temperature Fluctuations
If temperatures swing wildly, check that your ventilation system isn't overcooling the space. You may need to reduce fan speed or add a fan speed controller for better temperature stability. For more guidance, read our article on grow tent fan selection.
Excessive Noise
Vibrating fans or rattling ducting creates unnecessary noise. Secure all equipment firmly, use insulated ducting, and consider adding duct mufflers if needed. Quality fans like those from Gorilla's GXi line operate much more quietly than budget alternatives.
Featured Snippet Summary
How do I set up a grow tent? To set up a grow tent: 1) Assemble the frame starting with the base, 2) Install the canvas cover beginning with the roof, 3) Set up ventilation with carbon filter and inline fan at the top, 4) Hang grow lights 18-24 inches above plant level, 5) Install environmental monitors, and 6) Run a 24-hour test before adding plants. Proper setup ensures optimal growing conditions.
Frequently Asked Questions About Growing Tent Setup
How long does it take to set up a grow tent?
Most people complete a full grow tent setup in 2-4 hours, depending on tent size and experience level. The tent frame and canvas typically take 30-60 minutes, while installing ventilation, lighting, and accessories adds another 1-3 hours. Your first setup takes longer, but subsequent setups go much faster once you understand the process. Setting aside a full afternoon ensures you're not rushed and can do everything properly.
Do I need any special tools to assemble a grow tent?
No special tools are required for most grow tent setups. The Gorilla Grow Tent kit is designed for tool-free assembly with snap-together connections. You might find a rubber mallet helpful for ensuring poles are fully seated, but it's not necessary. A ladder or step stool helps when installing lights and fans at the top of taller tents. Everything else uses hand-tightened connections or simple clips.
Can I set up a grow tent by myself or do I need help?
You can absolutely set up most grow tents solo, though a helper makes the process easier and faster, especially for tents larger than 4x4. The trickiest part is pulling the canvas over the frame, where a second pair of hands prevents frustration. If working alone, take your time with the canvas installation and work gradually around the perimeter. For more tips, check out our detailed grow tent setup guide with solo assembly techniques.
What's the most important part of grow tent setup?
Ventilation setup is the most critical component. Poor ventilation causes temperature problems, humidity issues, and stagnant air that leads to disease and pest problems. You can temporarily work around lighting or other equipment limitations, but inadequate ventilation quickly damages plants. Invest time in properly sizing your fan, correctly positioning your carbon filter, and ensuring efficient airflow paths. For comprehensive ventilation guidance, read our carbon filter setup guide.
Should I set up my grow tent at its maximum height?
This depends on what you're growing. Most growers start with the included extension kit installed for maximum flexibility. The adjustable height feature in Gorilla Grow Tents lets you extend from 7 feet to 9 or even 10 feet tall. Extra height provides more options for light positioning and accommodates taller plants. You can always use less vertical space, but you can't add height without purchasing extension kits later.
How do I know if my ventilation is working properly?
Properly working ventilation creates slight negative pressure, meaning tent walls pull inward slightly when zipped closed. You should feel fresh air entering through intake ports and warm air exiting through exhaust. Temperature and humidity should remain within target ranges during operation. A simple test: place your hand near the exhaust outlet to feel strong airflow. If airflow is weak or temperatures run high, your ventilation system needs adjustment or upgrade.
What should I do if I encounter problems during setup?
First, consult the instruction manual that came with your tent and equipment. For Gorilla Grow Tent owners, lifetime customer support is available to help troubleshoot any issues. Take photos of the problem area, which helps support staff diagnose issues quickly. Most setup problems involve missed connections, reversed components, or sizing mismatches that are easily corrected once identified. Don't force anything – if a component doesn't fit easily, you're likely missing a step or have pieces in the wrong order.
Ready to Start Growing? Get Your Setup Right the First Time
Setting up your growing tent properly creates the foundation for gardening success. While the process might seem complex at first, following these step-by-step instructions ensures you avoid common pitfalls and create an optimal growing environment from day one.
Remember that your first setup teaches you valuable lessons for future adjustments and upgrades. Don't stress about perfection – focus on getting the fundamentals right with solid frame assembly, effective ventilation, and appropriate lighting.
The complete line of Gorilla Grow Tents makes setup straightforward with intuitive design, clear instructions, and durable components that snap together easily. Whether you're starting with a compact 2x4 tent or a spacious 5x5 growing space, Gorilla provides the quality and support you need for successful indoor cultivation.
Ready to transform your space into a thriving indoor garden? Start your setup today and join thousands of growers who trust Gorilla for reliable, long-lasting growing environments. Your plants will thank you for the careful attention to proper setup!
